Free tutorial - Christmas tree with quilting fabric scraps
Thisfabric Christmas treeis easy and quick to sew– I started and finished it in a few hours. You can adjust its size, make itsmall or largedepending on the available space.
The advantages of a fabric Christmas tree
A fabric Christmas tree hasmany advantagescompared to a “real” natural tree or an artificial tree.
- It is a sustainable Christmas tree that will serve you for many years!
- It is easy to find a spot for it : it hangs on a wall, suspended from a simple hook (temporarily replacing a picture frame), or even a door handle. Ideal for small spaces.
- It is by far the easiest tree to store once the Christmas holidays are over, during the remaining 11 months of the year: just roll it up and slip it into a drawer.
- Easy to maintain: if it wrinkles or gets dirty, just iron or wash it to make it like new.
- Unbreakable and space-saving, iIt is practical to carry and ship: great for long-distance Christmas gifts, or for those who move often.
- And besides, nothing stops you from decorating it to your taste.
At home, we gave up real Christmas trees after the little tree I carefully kept in a large vase eventually succumbed to the heat of a Mediterranean summer. Since then, we use a recycled and reusable Christmas tree, which I made from dry pine branches, which we take out of the garage to decorate every year.I really like its modern look, but it's not practical to ship.
As Christmas approached, I was looking for a tree easy to send by mail to one of my daughters who went to study far away, to brighten up her room. That's how I sewed thispatchwork fabric Christmas tree. It's an easy project to make.

Free pattern Christmas fabric tree: supplies
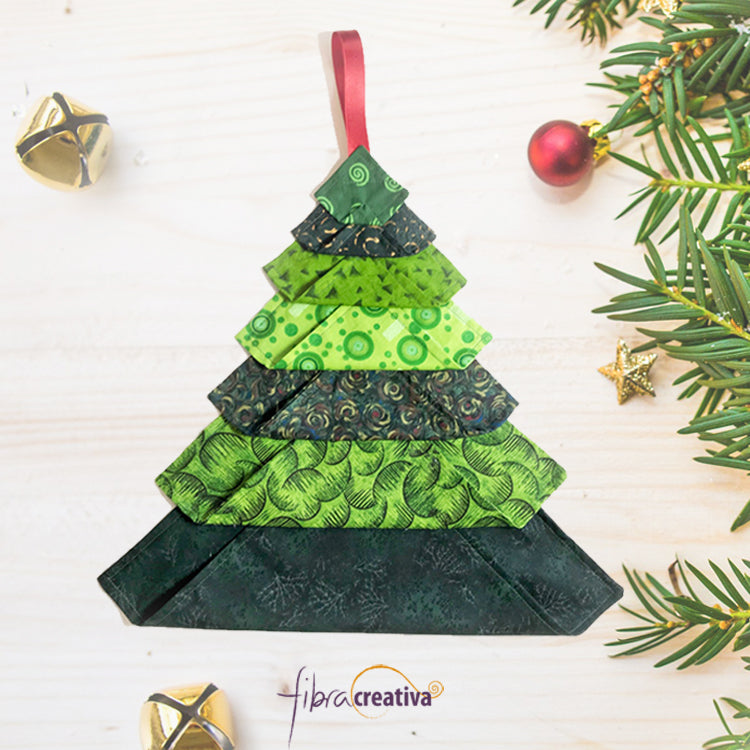
The tree is coMade up of squares of coordinating fabrics with small patterns; in this case,7 printed patchwork fabricsin different shades of green.You could add red, or choose another color scheme, for example, white, blue, and silver.
This is aperfect Christmas patchworkproject to use leftover fabric. So I suggest adapting the size of the squares based on the fabrics you have. You canalso add or remove colored squares if you want.
You need2 squares of each printed fabric, as well as a few centimeters of red ribbon.The amount of fabric depends on the size of the tree.
To sew my tree, I cut squares of 5×5 cm, 7x7 cm, 10x10 cm, 12x12 cm, 15x15 cm, 20x20 cm, 25×25 cm.
How to sew the fabric Christmas tree
It's very simple:
- Place 2 identical squares right sides together, and sew all around leaving a 2 or 3 cm opening on one side.
- Repeat for all the squares.
- Cut the corners diagonally. This helps achieve sharp corners.
- Turn thesquares right side out and press them with an iron.
- Starting with the largest square (the one at the bottom of the tree), fold it over about one third of its height.
- Place the second square flat on top and mark a horizontal line where you will fold it.This line will pass over the tip of the lower square, so it will be caught in the seam.
- Sew along this line.
- Repeat the operation down to the smallest square.
- When you reach the last square, add the folded ribbon loop to catch it in the seam.
And there you go!
Of course, a Christmas tree deserves some ornaments.You can decorate yours with fixed sewn ornaments (for example, yo-yos) or all kinds of hanging ornaments.
Since I was short on time, my fabric tree is not decorated. Instead, I filled the folds of the fabric withmy daughter's favorite dark chocolates before closing the package.
This project is quick and easy, you still have time to sew a small fabric Christmas tree or even a large tree before Christmas. If you like the idea, save it with a pin on Pinterest!


